
Introduction
For one of the little iPhone projects I’m working I need to communicate with with a server on the local network. That all sounds very simple, but what I *really* want to be able to do is detect all instances of this service on the local network, and give the user the option of which one to connect to at runtime.
In WCF land we could leverage WCF Discovery, but in the world of MonoTouch, and even in .NET 3.5, we don’t have that luxury, so it’s time to roll our own service discovery!
Ping! Pong!
To build our service discovery system we will be dropping down to the socket level; but don’t worry! We’re only using sockets to discover the services – after that you are free to use your normal HttpClient to actually access them 🙂
The basic idea is our client will send out a “ping” containing the IP and port to respond back on. Each server that picks up the ping will send a response back containing some metadata (in this instance a “service name” and a “service endpoint address”). The two classes we will use as “payload” are as follows:
[Serializable]
/// <summary>
/// Our initial ping "payload"
/// </summary>
public class ServiceClientInfo
{
    /// <summary>
    /// IP address of the client that sent the ping
    /// </summary>
    public string IPAddress { get; private set; }

    /// <summary>
    /// UDP port to send a response to
    /// </summary>
    public int Port { get; private set; }

    public ServiceClientInfo(string iPAddress, int port)
    {
        IPAddress = iPAddress;
        Port = port;
    }
}

[Serializable]
/// <summary>
/// Server response "payload" - could be anything
/// </summary>
public class ServiceInfo
{
    /// <summary>
    /// Standard port servers listen on
    /// </summary>
    public static readonly int UDPPort = 3512;

    /// <summary>
    /// Name of the service
    /// </summary>
    public string ServiceName { get; private set; }

    /// <summary>
    /// Endpoint address
    /// </summary>
    public string EndpointAddress { get; private set; }

    public ServiceInfo(string serviceName, string endpointAddress)
    {
        ServiceName = serviceName;
        EndpointAddress = endpointAddress;
    }
}
For our test app we will have a simple UITableView to display server responses, and a single button for sending our out ping. It looks a little something like this:
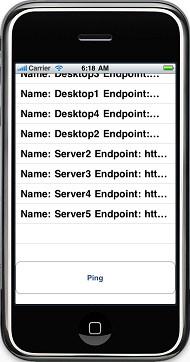
We will also verify that we have a working WiFi connection before we do anything. We do this using Miguel’s MonoTouch “reachability” sample code.
Step 1 – Firing the Ping from the iPhone
First things first, we need to fire off the initial ping from our phone by sending a UDP broadcast containing our “payload”. UDP is ideal for our application as it gives us a lightweight, connectionless transmission model which allows us to send a single message to every machine on the network using a broadcast. UDP is considered an “unreliable” protocol (i.e. it has no guarantees of delivery), but for our purposes that isn’t a problem. For more information on TCP/UDP and broadcasting you can take a look at the wikipedia pages: TCP, UDP, Broadcasting.
From a .NET code point of view this is pretty straightforward. We create an IPv4 UDP Socket, a UDP broadcast IPEndPoint, set some options and then use our Socket to send a serialised version of our “payload” to the network.
In this instance we are using the BinaryFormatter to serialise our payload (using a generic helper class in Helpers.cs), but you could serialise using any mechanism you like.
The code for this is as follows:
/// <summary>
/// Send our our server ping
/// </summary>
private void SendServerPing ()
{
    // Create a socket udp ipv4 socket
    using (Socket sock = new Socket (AddressFamily.InterNetwork, SocketType.Dgram, ProtocolType.Udp)) {
        // Create our endpoint using the IP broadcast address and our port
        IPEndPoint endPoint = new IPEndPoint (IPAddress.Broadcast, Discovery.Core.ServiceInfo.UDPPort);

        // Serialize our ping "payload"
        byte[] data = Discovery.Core.Helpers.SerializeObject<ServiceClientInfo> (new ServiceClientInfo (GetCurrentIPAddress ().ToString (), 8762));

        // Tell our socket to reuse the address so we can send and
        // receive on the same port.
        sock.SetSocketOption (SocketOptionLevel.Socket, SocketOptionName.ReuseAddress, true);

        // Tell the socket we want to broadcast - if we don't do this it
        // won't let us send.
        sock.SetSocketOption (SocketOptionLevel.Socket, SocketOptionName.Broadcast, true);

        // Send the ping and close the socket.
        sock.SendTo (data, endPoint);
        sock.Close ();
    }
}
Step 2 – Listening for Responses
Next up we need to listen for server responses. We actually start listening *before* we send the ping (to make sure we don’t miss anything), but it makes more sense to think of it as a second step.
There are two ways to listen to responses: synchronously, where we sit there and wait for a response to come back, or asynchronously, where we provide a callback method that will respond to data as it comes in. We obviously don’t want our UI to stop responding while we’re waiting, and we certainly don’t want the iPhone to kill our application for being unresponsive, so we will opt for the asynchronous model.
The steps for setting up a listener are, again, very simple. We first create an IPEndpoint, this time using the IP address and port we included in our initial ping, and create a UDPClient bound to it. Finally we call BeginReceive to tell the client we want to receive data asynchronously, providing our callback method, and start a timer to stop listening after 2 seconds. We pass in a simple “state” object to our callback, so it has access to our endpoint and client, but you could also store those as fields if you prefer.
While we are listening for responses we also disable our Ping button and re-enable it again, making sure to do so on the UI thread, once the timer has elapsed:
private void StartListeningForServerPingBacks ()
{
    // Disable our ping button
    PingButton.Enabled = false;

    // Listen on our IP addresses on our port
    // In a real scenario you'd probably want to make sure the port
    // was available and fallback to an alternative if not.
    var endPoint = new IPEndPoint (GetCurrentIPAddress(), 8762);

    // Make sure we don't grab exclusive "rights" to our address
    // so we can use the same port for send and receive.
    var udpClient = new UdpClient ();
    udpClient.Client.SetSocketOption (SocketOptionLevel.Socket, SocketOptionName.ReuseAddress, true);
    udpClient.ExclusiveAddressUse = false;
    udpClient.Client.Bind (endPoint);

    // Setup our "state" object so the callback has access to the client and endpoint
    UdpState state = new UdpState (endPoint, udpClient);

    // Setup our async receive
    // Our callback will be called if and when data comes in
    udpClient.BeginReceive (new AsyncCallback (this.ReceiveServerPingCallback), state);

    // Setup a timeout timer.
    // When the timer elapses we enable our ping button again and
    // close our udpclient.
    var enableTimer = new Timer (2000);
    enableTimer.AutoReset = false;
    enableTimer.Elapsed += delegate(object sender, ElapsedEventArgs e) {
        InvokeOnMainThread (delegate { PingButton.Enabled = true; });
        udpClient.Close ();
    };
    enableTimer.Enabled = true;
}
Step 3 – The Callback
Our callback method is rather simple (are you seeing a trend? :-)). We first grab the state object, call EndReceive to grab the data, deserialise it to our ServiceInfo object, add it to the UITableView, and then call BeginReceive again. That last part is the most important – every call to BeginReceive, which starts an asynchronous receive, must match a call to EndReceive, which ends the asynchronous receive. If we didn’t call BeginReceive at the end of our callback we would only ever get one server response – which obviously isn’t what we want!
As our timer may close the connection, and because we may get bad data sent to our listening port, we wrap the whole callback in a try/catch to make sure we don’t crash the app:
/// <summary>
/// Our callback that receives the pings back from the server(s)
/// </summary>
private void ReceiveServerPingCallback (IAsyncResult ar)
{
    try {
        // Grab the state object and split it up
        UdpState state = (UdpState)(ar.AsyncState);
        UdpClient client = state.client;
        IPEndPoint endPoint = state.endPoint;

        // Grab all the data we received
        Byte[] receiveBytes = client.EndReceive (ar, ref endPoint);

        // Deserialize it to our ServiceInfo object
        var data = Discovery.Core.Helpers.DeserializeObject<ServiceInfo> (receiveBytes);

        // Using the UI thread, update the server list
        InvokeOnMainThread (delegate { AddItemToList (String.Format ("Name: {0} Endpoint: {1}", data.ServiceName, data.EndpointAddress)); });

        // Start listening again
        client.BeginReceive (new AsyncCallback (this.ReceiveServerPingCallback), state);
    } catch (Exception) {
        // Just in case we have any network issues, or we've closed the socket, we catch everything.
        // Rather a horrible catch all than an app crash in this instance.
    }
}
The Code
And that’s that. The full application source is available below. The solution contains the iPhone app, a WinForms “server” that you can run multiple times on your Mac/PC, and a shared library with the common data types in.
I’ve successfully tested this code with 10 servers, spread across multiple machines, without any issues but if your app needs responses from a large amount of servers then your mileage may vary 🙂