Debugging xUnit Tests Using MonoDevelop

Introduction

After several months of neglect, we are currently working on getting the Nancy project ship shape on Mono. We’ve gotten to the point now where everything builds and runs just fine, but we have a few tests that fail when running on Linux/Mono. The failures we are seeing are obviously bugs in the tests/stubs/mocks themselves, and we need to debug them to see exactly what’s going on. MonoDevelop has some decent test runner features, but they appear to be heavily tied to NUnit which is a problem if you happen to use xUnit 🙂

Debugging With xUnit

Luckily the solution is relatively simple, if a little clunky:

  1. Download the latest xUnit release and unzip it somewhere.
  2. Set whatever breakpoint you need in MonoDevelop and build the test project (in debug mode, obviously).
  3. In MonoDevelop, go to Run, Debug Application, browse to where you extracted the ZIP from step 1 and choose the appropriate xunit.gui.*.exe depending on your target framework/architecture (xunit.gui.clr4.exe in our case).
  4. The gui xUnit runner will popup – click Assembly, Open, browse to the output of your test project, select the assembly and press OK.
  5. Click Run All in the bottom left.

The runner will run the tests and you should break out into MonoDevelop whenever you hit a breakpoint.

Pretty simple, if a bit of a ballache – but hey, you shouldn’t need to debug your tests very often anyway 🙂

Optional Parameters in C#4, C#3 and VB.Net, With a Side Order of IL Quirks

Introduction

One of the features C# has gained in it’s latest V4 incarnation is the ability to work with optional parameters. Now VB.Net (and the underlying IL) has had this ability for sometime, but as it’s new to C# folks, and causing a little confusion; I’m going to attempt to explain how it works, when it works and the potential gotchas. I’ll also cover a strange inconsistency between the the VB and C# compilers when it comes to named parameters.

Warning: This post contains IL, but don’t let that put you off – you don’t actually need to understand it to get the point of the post!

So It’s C#4 Only, Right?

Sort of 🙂 Just to confuse things, optional parameters, from both a definition and consumption perspective, are really the concern of the compiler. As other posts have correctly pointed out, as long as you’re using Visual Studio 2010 you can define and consume optional parameters while targeting an older framework version:

public void DoThings(int intParameter = 22, string stringParameter = "Default")
{
    // Do things
}

// ...

DoThings(); // Uses the default values

This will work whether you’re in the same assembly, or consuming a library that already exposes methods with optional parameters.

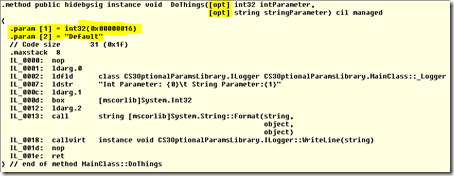
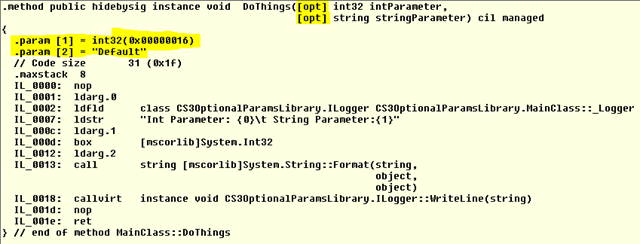
You can also happily consume C# libraries containing optional parameters with VB.Net; even if the VB.Net project is still running under VS2008. The reason this works it that the IL that the new C# compiler is emitting is nothing new, and VB.Net has been able to define and consume optional parameters for some time. You can see the IL that is generated for the above method in the ILDASM output below (interesting parts highlighted in yellow):
OptionalParamsIL

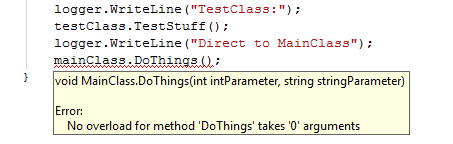
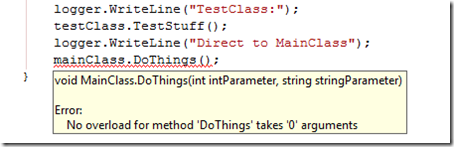
The one thing you *cannot* do is consume optional parameters using C# in Visual Studio 2008; even if you’ve built the library in VS2010 and targeted the older framework. The C#3 compiler just doesn’t understand (or more to the point doesn’t care about) optional parameters. If you try and build the code above using Visual Studio 2008 you will get the following error:
OptionalParameters2008

Definitely something for library authors to consider – we’re not quite out of “overload hell” yet unfortunately.

Gotchas?

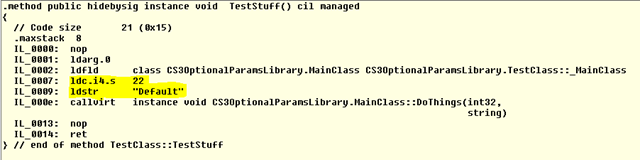
Now you may well think that when you consume an optional parameter, the compiler is emitting code that pulls the default value from the method information at runtime – but that isn’t the case. In a similar fashion to the way the compiler handles consuming consts, the default values are “baked into” the calling code. This is true whether the calling code is in the same assembly as the definition, or a separate assembly . The following ILDASM screenshot shows the IL generated for the DoThings() call above (interesting parts highlighted in yellow again):
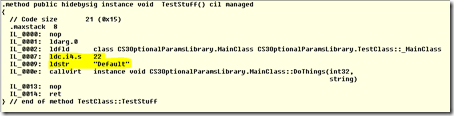
CallingOptionalIL

Even if you don’t fully understand the IL you can clearly see the constant values in the code are “baked into” the TestStuff() method.

The issue this can cause is the same for exposing public consts – if you change the default values in a library, but don’t recompile the calling code, then the calling code will still call your method(s) with the old default values. This is definitely something you need to consider when designing APIs using optional parameters.

One potential way to “work around” this issue and avoid “locking yourself in” to a particular set of defaults would be to follow the following pattern:

public void DoThings(int? intParameter = null, string stringParameter = null)
{
    if (intParameter == null)
        intParameter = 22;

    if (stringParameter == null)
        stringParameter = "Default";

    // Do Stuff
}

In the code above we still get the benefits of having optional parameters; but because we use “marker” values for defaults (nulls in this case), and set the *real* defaults inside the method, we are free to change the real defaults at a later date. This technique does require more code, and doesn’t look quite as elegant as the previous example, but in my opinion the benefits outweigh the drawbacks, especially for public APIs.

A VB/C# Named Parameters Quirk

As I was pulling together the IL for this post I discovered a small “quirk” when comparing the IL output by the VB.Net compiler to the output of the C’# compiler when dealing with named parameters. If we call the DoThings() method above and specify just the stringParameter the IL produced by the VB.Net compiler looks as I would expect:

vb-named

The default value for the intParameter is pushed onto the stack, followed by our “Nondefault” string value and the method is called. The IL produced by the C# compiler is slightly different though, as shown by the highlighted sections below:

cs-named

In the C# version the “Nondefault” string is pushed onto the stack *first*, then pops it off into a local variable (stloc.3), the default value for intParameter is then pushed, followed by the contents of the local variable (ldloc.3).

Not a massive difference, and I’m sure there’s a good reason for it, but the C# version does look decidedly “odd” to me. I’m no expert in IL performance, but this may be conclusive proof that VB is faster than C# 😉 *

Update: Marc Gravell was kind enough to review this post for me and correctly pointed out that I should really be comparing IL for *optimised* builds, not debug builds (which have optimisation turned off). Marc has done this for himself and confirmed the stloc and ldloc are still present, so my point is still valid (*phew*)

* Note: This is a joke.. I got some abuse on Twitter for “VB bashing” recently, hopefully this will appease the VB heads! 🙂

Announcing: TinyMessenger

Introduction

Just a small post to announce I have added, and finally documented, TinyMessenger to the TinyIoC project.

Tiny What-Now?

TinyMessenger provides an event aggregator/messenger for loosely coupled communication. Some scenarios where this may prove useful :

  • Communication between Controllers/ViewModels.
  • Service classes raising “events”.
  • Removing responsibilities from classes that receive external events (such as the AppDelegate in an iPhone application).
  • Decoupling communication between classes.

TinyMessenger uses a Publish/Subscribe model and is orderless, so you can subscribe to a message even if there’s nobody publishing, and you can publish one even if nobody is subscribed. It is also loosely coupled in that the publisher and subscriber know nothing of each other, all they both care about is the message itself. Some of the key features are:

  • Simple and orderless Publish/Subscribe API.
  • Messages either need to implement a simple “marker” interface, or they can build on the “base” classes that are in the box (TinyMessageBase and GenericTinyMessage<TContent>.
  • Subscriptions can supply an optional filter – only message that “pass” the filter are delivered.
  • Subscriptions can supply an optional “proxy”. A proxy can be used for marshalling to the ui thread, logging or many other purposes.
  • Subscriptions use weak references by default, but strong references can be specified if required.

TinyMessenger is part of the TinyIoC project, but it can be used completely independently – for more information take a look at the TinyMessenger Wiki page on the main TinyIoC site.

Automated “Unit” Testing – It’s Not Just for TDD, It’s for Bug Fixing Too!

Disclaimer – What I’m discussing here isn’t unit testing (hence the quotes), it’s more functional or integration testing; but as the term “Unit Testing” is often “abused” to mean “anything that uses a (unit) testing framework” so I’ve included it in the title to avoid confusion.

Introduction

I’m currently using TinyIoC in my first forays into MonoTouch development, and my initialisation code was throwing a resolution error on starup:

var container = TinyIoCContainer.Current();
var mainView = new MainView();
container.Register<IViewManager>(mainView);
container.Register<IView, MainView>(mainView, "MainView");
container.Register<IView, SplashView>("SplashView").UsingConstructor(() => new SplashView());
container.Resolve<IView>("MainView");
container.Register<IStateManager, StateManager>();
// Code was blowing up here..
var stateManager = container.Resolve<IStateManager>();
stateManager.Init();

The Exception that was given was that IStateManager could not be resolved, which was odd given that the StateManager was registered against IStateManager, and everything in its constructor was also registered:

public StateManager(IViewManager viewManager, Func<string, IView> viewFactory)

To The Debugger.. Right?!

So at this point your immediate reaction may be to fire up the debugger, trace into the code and start hacking around, debugging and hacking around some more until it works. Sure, that’s an approach, and one I’m sure we’ve all used in the past; but as I was pretty sure the issue was in TinyIoC itself I took a slightly different tack.

To The Test Runner!

With the approach above I would have to build and run my app every time I wanted to check if my “fix” had actually worked – and even if it had, how would I know it hadn’t broken something else? The solution is quite simple – recreate the conditions of the bug in a unit test, using stubs/mocks to replace your real classes, and make sure it fails in the same way:

[TestMethod]
public void Dependency_Hierarchy_With_Named_Factories_Resolves_All_Correctly()
{
    var container = UtilityMethods.GetContainer();
    var mainView = new MainView();
    container.Register<IViewManager>(mainView);
    container.Register<IView, MainView>(mainView, "MainView");
    container.Register<IView, SplashView>("SplashView").UsingConstructor(() => new SplashView());
    container.Resolve<IView>("MainView");
    container.Register<IStateManager, StateManager>();
    var stateManager = container.Resolve<IStateManager>();
    stateManager.Init();

    Assert.IsInstanceOfType(mainView.LoadedView, typeof(SplashView));
}

I’ve added an Assert to show what behaviour I think it *should* have. It’s a pretty horrible looking test, but it accurately represents what my failing code was doing, and the test fails as I expected it to. Now I can attach the debugger and find out what’s going on, safe in the knowledge I have a fast executing test available to verify my fix, and the rest of my test suite there to ensure I haven’t broken anything else.

After a very brief investigation it turned out that there was a bug in registration when *just* an Interface type was registered with an concrete instance (the IViewManager registration above). The “InstanceFactory” it was using hadn’t set the “AssumeResolves” flag, so TinyIoC was actually trying to find a valid constructor for IViewManager – which obviously wasn’t going to succeed. It’s a scenario I probably should have factored into my Unit Tests, but hey, nobody is perfect 🙂

Conclusion

This post is aimed at covering two points:

  1. Test aren’t just for TDD. If you find a bug, isolate it with a test and you have a quick and easy way to verify a fix, and verify you haven’t broken anything else.
  2. Code Coverage isn’t everything. Apart from a few “defensive coding” null checks, the core of TinyIoC has pretty much 100% code coverage with its tests, but it didn’t help me with this issue. Although the code path was covered, the exact input (Interface type, concrete instance) wasn’t in my unit tests, so don’t assume 100% code coverage means 0 bugs in the code, there may well be a scenario you missed!

Announcing: TinyIoC – An Easy to Use, Hassle Free, Inversion of Control Container

Introduction

Whenever I start a new “pet” project I usually *want* to use IoC, but I don’t really want the hassle of taking a dependency on a container, or adding another binary to my project. Usually this leaves me using “poor man’s IoC”, whereby I define dependencies in my constructors, but I pass them in manually or construct them using constructor chaining.

I’ve thought for some time that it would be useful to put together a container that fits the bill for that scenario, but also attempts to “lower the barrier of entry” for developers that are new to IoC, and may be scared off by the “big boys”. A couple of weeks ago @DotNetWill posted his simplified container, and that gave me the kick up the backside I needed to create my own 🙂

Introducing TinyIoC

Now you might ask “do we really need *another* IoC container?” – and it’s a reasonable question. We already have Unity, Ninject, StructureMap, AutoFac.. the list goes on. TinyIoC makes no attempt to go “head to head” with any of these other containers, instead TinyIoC has been designed to fulfil a single key requirement:

To lower the “level of entry” for using an IoC container; both for small projects, and developers who are new to IoC.

To that end, TinyIoC attempts to stick the following core principals:

  • Simplified Inclusion. No assembly to reference, no binary to worry about, just a single cs file you can include in your project and you’re good to go. It also works on Mono, and on MonoTouch for the iPhone / iPad.
  • Simplified Setup. With auto-resolving of concrete types and an “auto registration” option for interfaces, setup is a piece of cake. It can be reduced to 0 lines for concrete types, or 1 line if you have any interface dependencies.
  • Simple, “Fluent” API. Just because it’s Tiny, doesn’t mean it has no features. A simple “fluent” API gives you access to the more advanced features, like specifying singleton/multi-instance, strong or weak references or forcing a particular constructor.

The following snippet gives an example of the simplified setup:

// TinyIoC provides a lazyily constructed singleton
// version of itself if you want to use it.
var container = TinyIoCContainer.Current;

// By default we can resolve concrete types without
// registration
var instance = container.Resolve<MyConcreteType>();

// We can automatically register all concrete types
// and interfaces with a single call.
container.AutoRegister();
var implementation = container.Resolve<IMyInterface>();

So Where Now?

If you want to grab the source, read the tests, or take a look at some more complex examples of the API, wander on over to the homepage on bitbucket. I’m happy to take comments and suggestions – just grab me on Twitter or ping me an email from the contact form.

Over the next few weeks I will be posting a series of “beginners” articles on the hows and whys of IoC. I will be using TinyIoC specifically, but the majority of concepts and content can equally apply to other containers. I may even do a “File, New” screencast to show how “un-scary” this stuff is, and how it doesn’t really add any extra development effort,