Hotwire – A Remote Control Quick Launch Utility for LogMeIn

hotwire-small

Introduction

Hotwire is a project I started some time ago but never completed. It was designed to be a “quick launch” utility for remote controlling machines using the excellent LogMeIn service. While the better half was “enjoying” the Boxing Day sales I took it upon myself to finish the project. And by finish, I obviously mean a complete rewrite 🙂

What does it do?

I’ve used LogMeIn for quite a while now, and it’s an excellent service, but 99% of the time I just want to get straight to the desktop of the machine I’m connecting to and Hotwire is designed to let me do just that.

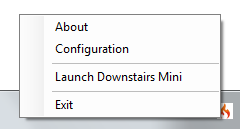
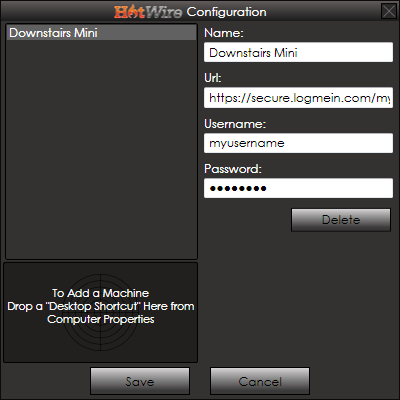
The application itself is written using WPF and consists of two parts; the launcher, which sits in the task tray, and the main application. The launcher provides machine configuration and quick launch options for connecting to remote machines. The main application is just a single window (containing a WPF WebBrowser control) that connects to LogMeIn and does some jiggery pokery to get you directly to your machine desktop.

More Information

The project is up on Google Code at http://code.google.com/p/hotwire/ – I normally prefer to use CodePlex, but the Hotwire name was already taken 🙁 The Google code site contains a downloadable installer, and the source code should anyone be interested.

Screenshots

Tray

Configuration

WPF RichTextBox Subscript and Superscript Without Font Restrictions

Introduction

One of the most bizarre limitation of the WPF RichTextBox is its hit and miss support for subscript and superscript in text. Although you can set the style quite easily using appropriate command, in order for this property to actually alter the appearance of the text the font needs to be OpenType, and come with a Subscript/Superscript variant, which the vast majority of fonts do not. Obviously in a control that’s designed for user input, restricting what fonts can be used in this way is far from ideal.

An Alternative Approach

Having spent some time poking around inside RichTextBox I would strongly recommend that you don’t. Seriously. The code may well make you physically sick. In the past I have tried to use TextRange.ApplyPropertyValue, which takes a normal DependencyProperty, to attach my own property to a piece of text. You’d imagine this would be pretty straightforward, especially as attaching properties to other types is a fairly fundamental part of WPF, but unfortunately there’s a particularly lovely piece of code that checks to see if the DependencyProperty is on a predefined “allowed” list, and thows an exception if it isn’t. While this chunk of code scuppered my ideas in the past, it did provide a useful place to look for an alternative way to create Subscript and Superscript text.

One of the properties that we are “allowed” to apply to text is Inline.BaselineAlignmentProperty which takes its values from the BaselineAlignment enumeration which includes the following values:

  • Top
    A baseline that is aligned to the upper edge of the containing box.
  • Center
    A baseline that is aligned to the center of the containing box.
  • Bottom
    A baseline that is aligned at the lower edge of the containing box.
  • Baseline
    A baseline that is aligned at the actual baseline of the containing box.
  • TextTop
    A baseline that is aligned at the upper edge of the text baseline.
  • TextBottom
    A baseline that is aligned at the lower edge of the text baseline.
  • Subscript
    A baseline that is aligned at the subscript position of the containing box.
  • Superscript
    A baseline that is aligned at the superscript position of the containing box.

Subscript and Superscript look exactly like what we want, and amazingly, they actually work 🙂 To demonstrate the technique I’ve created two simple extension methods that toggle either Sub or Superscript on the selected text:

/// <summary>
/// Toggle Superscript for the currently selected text in a RichTextBox. Does not require the font to be OpenType or have a Superscript font style.
/// 
/// Doesn't attempt to change/restore the size of the font, just moves the baseline.
/// </summary>
/// <param name="richTextBox">RichTextBox with selected text</param>
public static void ToggleSelectionSuperscript(this RichTextBox richTextBox)
{
    var currentAlignment = richTextBox.Selection.GetPropertyValue(Inline.BaselineAlignmentProperty);

    BaselineAlignment newAlignment = ((BaselineAlignment)currentAlignment == BaselineAlignment.Superscript) ? BaselineAlignment.Baseline : BaselineAlignment.Superscript;
    richTextBox.Selection.ApplyPropertyValue(Inline.BaselineAlignmentProperty, newAlignment);
}

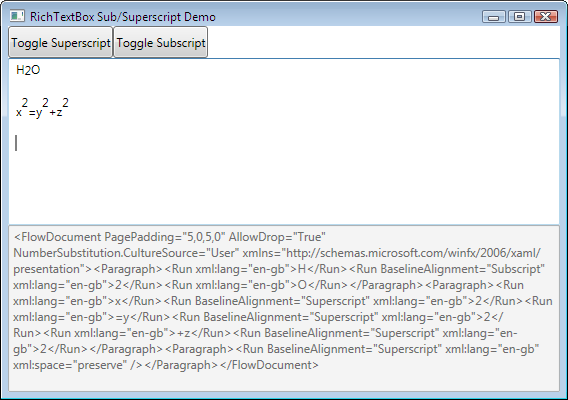
The code checks the current value of the BaselineAlignmentProperty and toggles the value as appropriate. I’ve made no attempt to adjust font size, or do anything clever, so it does look a little goofy, but it proves the concept. The demo application also includes the XAML content of the RichTextBox document so you can see exactly what content it’s producing:

RichTextBoxSubSuperscriptScreenshot

And that’s that, hope it helps someone out 🙂 You can grab the sample demo from the link below:

RichTextBoxSubSuperscript.zip

Localising WPF Applications Using RESX Files and Standard Data Binding (Without a MarkupExtension)

Introduction

Localisation is something everyone should really care about. Creating your applications, or websites, in a manner that can be easily localised for different languages and cultures is not only “good practice”, but it may also provide additional opportunities.

Luckily the .NET framework, and WPF, has rich support for localisation, with WPF even having “baked in” support for switching flow direction for right to left languages. On top of that Rick Strahl and Michele Leroux Bustamante compiled an excellent guidance document detailing several technique for localising WPF applications. The documentation, along with sample code, can be found in the WPF Localisation Guidance project on CodePlex.

The document discusses several techniques for localising applications using RESX (resource) files, which is my preferred approach; but each of the techniques has its drawbacks:

  • Static Binding. Simple and easy, but lacks support for dynamically switching culture.
  • Attached Properties. Look powerful, but lacks support for value convertors and it’s a bit inefficient.
  • Markup Extension. A new instance of the helper (complete with event wireup for locale switching) is created for every control, which doesn’t sound ideal and may lead to memory leaks.

All of the techniques are perfectly workable solutions, but with Binding and INotifyPropertyChanged WPF already contains a powerful mechanism for mapping and automatically updating UI elements with data; surely there’s some way we can leverage those? My goal was to attempt to find a way to localise an application with the following criteria:

  • Use the standard Binding syntax so we can support value convertors.
  • No complicated markup extensions.
  • Provide a mechanism for code to “register” resources that can be consumed anywhere in the application, even from other PRISM modules.
  • Be able to cleanly switch locales, without restarting the application or closing/reopening screens.
  • Support the design experience with a minimum of fall back values when in design mode.

The Result – Localisation Using Binding

If you just want to see the code, there’s a basic implementation, and a PRISM demonstration, at the end of the article. Both implementations use the same basic “moving parts”:

LocalisationHelper

In essence this is our ViewModel. There are two key pieces of code here, first being:

public string this[string Key]
{
    get
    {
        if (!validKey(Key))
            throw new ArgumentException(@"Key is not in the valid [ManagerName].[ResourceKey] format");

        if (DesignHelpers.IsInDesignModeStatic)
            throw new Exception("Design mode is not supported");

        return _resourceManager.GetResourceString(GetManagerKey(Key), GetResourceKey(Key));
    }
}

This allows us to bind elements to the LocalisationHelper and provide a “key” which will be used to lookup the correct resource manager and resource string. Our binding uses a little known syntax that looks like this (take note of the initial “.”):

{Binding Path=.[MyResourceManager.MyResourceString]}

To provide design support we throw an exception if we detect design mode (using code from Laurent Bugnion’s MVVM Light Toolkit) so the FallbackValue can be used instead. I’m not too keep on throwing an exception, but I couldn’t see a cleaner way to “fail” the binding.

The other important code hooks an event that fires when the locale changes, and fires a NotifyPropertyChangedEvent with an empty property string. This triggers a refresh for all controls that have bindings to the LocalisationHelper.

ResourceManagerService

The ResourceManagerService provides several functions:

  • The ability to register ResourceManagers – these are automatically generated by Visual Studio when you create RESX files and are used to load the locale specific strings.
  • Retrieve a resource string from a given ResourceManager.
  • Get and set the current locale. A locale consists of an IETF language tag (such as en-GB) and a boolean to indicate whether the locale uses a right to left flow direction.
  • A event that is fired when the locale changes. This is hooked by the LocalisationHelper, for firing PropertyChanged events, and also by the main Window which uses the right to left flag to set the flow direction.

Give Me The Code Already!

There are two samples attached. The first is a simple application that uses a static ResourceManagerService that shows the basic implementation. The second is a PRISM based application that uses the container/service locator, EventAggregator, weak references, and several different modules to give a more “advanced” example.

ResourceTest.zip

PRISMResourceTest.zip

Conclusion

I haven’t yet used this solution in anger, but it certainly seems to “tick all the boxes” from my initial requirements. Comments, suggestions, criticisms and flames are welcomed 🙂


System.OutOfMemoryException Gotcha Using Clipboard.GetData in WPF

Introduction

Consider the following simple class for managing storage and retrieval of custom classes in the Windows Clipboard using WPF:

using System;
using System.Windows;

namespace ClipboardTest.Services
{
    public class ClipboardService : IClipboardService
    {
        public bool ContainsData<T>() where T:class
        {
            return Clipboard.ContainsData(typeof(T).ToString());
        }

        public void SetData<T>(T data) where T:class
        {
            Clipboard.SetData(typeof(T).ToString(), data);
        }

        public T GetData<T>() where T : class
        {
            return Clipboard.GetData(typeof(T).ToString()) as T;
        }
    }
}

Simple stuff, but it lets me abstract the clipboard away and remove the usual “magic string” approach for clipboard types.

Now consider the following basic tests:

using ClipboardTest.Services;
using Microsoft.VisualStudio.TestTools.UnitTesting;

namespace ClipboardTest.Test.Services
{
    public class TestPayload
    {
        public string Data { get; set; }
    }

    [TestClass]
    public class ClipboardServiceTests
    {
        [TestMethod]
        public void SetData_CustomClass_ClipboardContainsInstanceOfClass()
        {
            string data = @"More Cowbell";
            var clipboardService = new ClipboardService();

            clipboardService.SetData<TestPayload>(new TestPayload() { Data = data });

            Assert.IsTrue(clipboardService.ContainsData<TestPayload>());
        }

        [TestMethod]
        public void SetDataGetData_CustomClass_ReturnsEquivilantClass()
        {
            string data = @"More Cowbell";
            var clipboardService = new ClipboardService();

            clipboardService.SetData<TestPayload>(new TestPayload() { Data = data });
            var output = clipboardService.GetData<TestPayload>();

            Assert.IsNotNull(output);
            Assert.AreEqual(data, output.Data);
        }
    }
}

Again, all very simple. The first test checks to make sure that the class gets stored onto the clipboard, and the second checks to see if the class we get back off the clipboard is the same as the one we put in.

The more astute among you have probably spotted the problem in the test code already, but the resultant symptoms are a little confusing.

System.OutOfMemoryException?

When we run the tests the first test runs absolutely fine, but the second test crashes out with a System.OutOfMemoryException. A bit more digging showed that storing and retrieving standard types such as strings, ints etc all worked fine, but my own class was throwing an exception.

Checking good old MSDN threw up the following statement:

An object must be serializable for it to be put on the Clipboard.

Seeing as I had stupidly forgotten to add the SerializableAttribute to the TestPayload class that definitely explained why things weren’t working as I expected; but it didn’t really explain the actual behaviour I was seeing. Another quote from MSDN, but from the WinForms documentation, stated:

If you pass a non-serializable object to a Clipboard method, the method will fail without throwing an exception.

So from that I would expect SetData to silently fail, and for nothing to be on the clipboard. However the first test above clearly shows that the clipboard at least thinks that something of our specified type has been added to the clipboard – it just throws an exception when we try and retrieve it again. Marking the payload class as serializable did fix the issue, but the behaviour I was seeing certainly didn’t make that obvious!

Just out of interest I tested the same code using the WinForms Clipboard class, which looks to all intents and purposes exactly the same as the WPF one, and that did fail silently and returned null from GetData.

Conclusion

So, after all that rambling, the conclusion is that if you are working with the Clipboard in WPF and you are getting System.OutOfMemoryExceptions that don’t seem to make any sense, then you’ve probably forgotten to add the SerializableAttribute to whatever class you placed on the Clipboard.

Bindings Not Updating in WPF / Silverlight? Common Mistakes

Introduction

Yesterday I was working on a small prototype, which I will be blogging about shortly, and ran across the common problem of my bindings not updating. A very common problem, and one that’s usually a very simple fix once you’ve tracked it down.

Yes, I’m an Idiot!

Normally my ViewModels inherit from my ViewModelBase base class, which provides a RaisePropertyChanged method and, when in debug mode, uses reflection to check if the property name is valid. Now I’d recently refactored the code so this particular ViewModel wasn’t using the base class, so my first instinct was that I’d simply mistyped the property name magic string in the event – but that was all fine.

I threw in a few breakpoints and I could see my ViewModel was changing, I could see the OnPropertyChanged method being hit, but there didn’t seem to be any listeners and as a result my UI was just ignoring the changes.

After a few minutes of head scratching I noticed that although my class was firing the PropertyChanged event correctly, I hadn’t added INotifyPropertyChanged to my class declaration when I removed the base class! So although I was firing an event that looked like INotifyPropertyChanged.PropertyChanged, I was actually just firing my own event with the same name 🙂

Conclusion

So there you have it, I’m an idiot 🙂 The moral of the story is, when your bindings aren’t working check the obvious:

  1. The property name is correct. A base class that checks this in debug mode can be useful, or failing that, watch the Output window.
  2. Check you are actually implementing INotifyPropertyChanged and not just firing events that happen to have the same name 🙂