Hotwire – A Remote Control Quick Launch Utility for LogMeIn

hotwire-small

Introduction

Hotwire is a project I started some time ago but never completed. It was designed to be a “quick launch” utility for remote controlling machines using the excellent LogMeIn service. While the better half was “enjoying” the Boxing Day sales I took it upon myself to finish the project. And by finish, I obviously mean a complete rewrite 🙂

What does it do?

I’ve used LogMeIn for quite a while now, and it’s an excellent service, but 99% of the time I just want to get straight to the desktop of the machine I’m connecting to and Hotwire is designed to let me do just that.

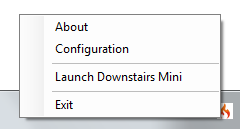
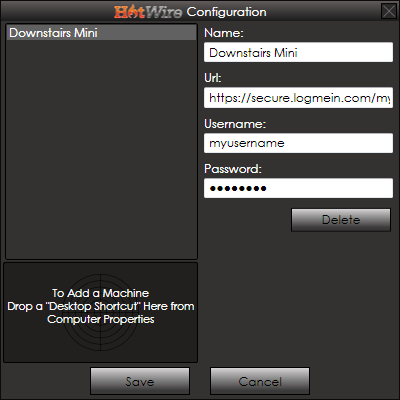
The application itself is written using WPF and consists of two parts; the launcher, which sits in the task tray, and the main application. The launcher provides machine configuration and quick launch options for connecting to remote machines. The main application is just a single window (containing a WPF WebBrowser control) that connects to LogMeIn and does some jiggery pokery to get you directly to your machine desktop.

More Information

The project is up on Google Code at http://code.google.com/p/hotwire/ – I normally prefer to use CodePlex, but the Hotwire name was already taken 🙁 The Google code site contains a downloadable installer, and the source code should anyone be interested.

Screenshots

Tray

Configuration

Stack Overflow – Share Your Flair – Now in PNG!

Introduction

This morning I was taking a look at the new (ish) meta stackoverflow site, and noticed a thread asking “Can we get flare as an image?”. It seemed like a good idea, especially for forum signatures and the like, so I thought that seeing as I’d recently updated the WordPress widget, that I’d try and put something together.

Pretty as a Picture (or not)

As C# is generally my weapon of choice these days, I was originally going to knock something together in ASP.Net. I was thinking something along the lines of rending a WPF control to a bitmap, and emitting that as an image. I decided against that approach because:

  1. ASP.Net hosting is generally more expensive – most people I know seem to stick to *nix hosting.
  2. Rendering WPF to a bitmap doesn’t work in partial trust scenarios; so it might not even work on ASP.Net hosting anyway.

So, feeling in a masochistic mood, I thought I’d knock something together in lovely old PHP; the results of which look something like this:

Steve Robbins' StackOverflow Profile

Or, by passing in a userid on the querystring:

Marc Gravell's StackOverflow Profile

You can test  it with your own details by changing the userid on the following url:

https://www.grumpydev.com/imageFlair/imageFlair.php?userid=1

Images are cached (for 30minutes by default) and all of the StackOverflow data is taken from the JSON feed, so the strain on SO should be fairly minimal.

The Code

You can use the script hosted on here if you want (although I might have to change my mind on that if the load gets too high), or you can download the code and run it on your own box:

https://www.grumpydev.com/imageFlair.zip

Although it will run just fine “out of the box”, the code is pretty flexible; with plenty of configurable options for fonts, colours, positioning, background images, caching time etc. Take a look in config.php and you’ll hopefully find you can change everything you want to without having to delve into the main code.

Bear in mind that I am far from a PHP expert, and this was put together in a few hours, so please don’t laugh too much if you do take a peek at the source 🙂

Font Support / Licensing

The text is rendered to the bitmap using a TrueType font of your choosing, which gives us some nice flexibility. Unfortunately though, none of the fonts that we generally take for granted, such as Arial, Verdana etc. come with any distribution rights; so I can’t include any in the source archive. This might not be a problem if you already have your favourite TrueType fonts installed; but if you don’t you can get a “free” version of several core fonts from http://sourceforge.net/projects/corefonts. You just need to extract the archives using WinRAR, or 7zip, or something of that ilk; then just drop the TTF file into the source code directory.

That’s it – hope someone finds it useful 🙂

Update – Bug Fixes and Pretty URLs

After some feedback from the meta question I’ve fixed a stupid bug in the gravatar code, so now it should work for people who have a 1 in their gravatar hash (don’t ask! :-)).

I’ve also enabled “pretty urls” on the hosted version, so now you can go to a url like:

https://www.grumpydev.com/imageFlair/658.png

And you’ll get the PNG for the corresponding userid. I do intend to expand it to include Flair for the other sites in the “Stack Overflow” family, but I haven’t had chance yet.

For those that are interested, this is the .htaccess file that enables the pretty urls, and also reduces the cache time on pngs to 1 second:

<IfModule mod_rewrite.c>
RewriteEngine On
RewriteRule ^(.*)\.png$ imageFlair.php?userid=$1 [L]
</IfModule>

<IfModule mod_expires.c>
ExpiresActive On
ExpiresByType image/png "access plus 1 seconds"
</IfModule>

Update 2 – Supporting the Whole Family

I’ve added an optional parameter to specify which site’s information to display. The “pretty” url format now looks like this:

http://[ur]/[mode]/[id].png

Where [mode] is one of:

So for Jeff (id number 1 everywhere is easy :-)) we end up with:

Stack Overflow Meta Server Fault

The htaccess file now looks like this:

<IfModule mod_rewrite.c>
RewriteEngine On
RewriteRule ^(.*)/(.*)\.png imageFlair.php?mode=$1&userid=$2 [L]
RewriteRule ^(.*)\.png$ imageFlair.php?userid=$1 [L]
</IfModule>

<IfModule mod_expires.c>
ExpiresActive On
ExpiresByType image/png "access plus 1 seconds"
</IfModule>

Source ZIP is updated with all the latest changes. Hopefully that will be it for the time being! 🙂


Sync Live Writer Local Drafts Across Multiple Machines with DropBox

Introduction

Anyone that blogs should be using Live Writer, end of discussion. It’s brilliant in its own right (and surprisingly doesn’t just support Windows Live blogs!) and its various plugins just make life so much better for bloggers.

One of the features it has, which I’ve always found a little limiting, is the ability to save local drafts. These drafts are saved into your local Documents folder, which is fine if you blog from a single machine, but if you chop and change machines as often as you change your socks like I do, then it’s not a whole lot of use. Admittedly it does give you the option of saving drafts to your blog (with WordPress at least), but I don’t particularly want ALL my inane nonsense cluttering my blog drafts 🙂

Asking The Question

I asked Joe Cheng, one of the Live Writer developers, on Twitter about whether changing the default location was possible. Unfortunately it’s one of those features that’s “on the list” for the next major version, but not implemented this release. Jason Burns was kind enough to point out a solution using Live Mesh, which works a treat; but DropBox is my “cloud storage of choice”, and one of the first things I install on any machine, so I hacked together my own solution.

The Solution / Workaround / Bodge

One of features of NTFS, which isn’t widely used, is the ability to create “junction points”. Junction Points are very similar to symbolic links in the UNIX world – they create a file or folder that “maps” to another file or folder; so when I go to c:\myfakefolder I can actually be looking at files in c:\myrealfolder. They’re not used all that often because Shortcuts generally do a good enough job for linking one place to another; but in this scenario Shortcuts don’t cut the mustard (Live Writer will just ignore it and create its folder again), so a junction point it is!

First things first we need to copy or create the “My Weblog Posts” directory in our Dropbox, which you can just do with Explorer, then delete the original from our Document folder. You might want to back it up in case this goes horribly wrong 🙂

Next we need to create our junction point, which is easy in Vista and Win7, as they both come with utilities to manage them, but for XP or Windows 2000 you will have to download a SysInternals utility called Junction from Technet. The syntax for the two methods is slightly different, but the basic concept is the same. We tell the utility the location of the link we want to create (which will be <your documents directory>\My Weblog Posts) and where to point it to (which will be <your dropbox directory>\My Weblog Posts). E.g.:

Vista / Win7

mklink /D "%UserProfile%\Documents\My Weblog Posts" "%UserProfile%\Documents\My Dropbox\My Weblog Posts"


WinXP / Win2k

junction "%UserProfile%\My Documents\My Weblog Posts" "%UserProfile%\My Documents\My Dropbox\My Weblog Posts"

And that should be that. If you copied existing drafts to your Dropbox you should be able to see them from the Open dialog. There does appear to be a small bug in Live Writer whereby it doesn’t show you the drafts in the shortcut list on the right hand side until you’ve actually saved a draft; but you can access them just fine from the Open menu, and they’ll magically appear once you’ve saved a draft for the first time.

I worked on this post using this workaround on two different machines, so it does seem to work nicely; but as with all workarounds, please make sure you back everything up just in case!

*Update*

If you don’t want to type these commands in manually then Will Charles has created a useful little GUI utility to take some of the pain away. You can grab it over on his blog.

Substitute – Variable Substitution Utility for Config Management (FinalBuilder etc.)

Introduction

At Lightbox we use an excellent program called FinalBuilder for automating all of our builds, and managing the configuration for the various environments we build to (system test, user acceptance testing, production etc.) It’s a very powerful tool and our “scripts” allow us to produce and deploy a build from a particular branch/tag in Subversion, targeting a particular configuration, with the touch of a button.

Once you get used to putting the projects together, using FinalBuilder is a huge time saver. One of the features it gives you is the ability to substitute “tags” in a file with the corresponding value from a project variable; so for example you could substitute %ServerName% for the variable called ServerName in the project. While this is very useful, it does require several steps to set it up each variable:

  • Create the configuration file (or template) containing the %VARIABLE% tag.
  • Add the corresponding variable name to an INI file (FinalBuilder had native support for INI files).
  • Add the variable to the project.
  • Configure the project to load that variable from the INI file.
  • Add the build command to do the substitution (obviously you will usually do this once for all the variables).

While none of those tasks are particularly onerous, it is quite error prone when you are relying on your developers to perform each task, and does make writing “generic” scripts quite tricky. You may not even want your developers meddling with your build process in the first place!

Substitute Utility

As an attempt to get the same level of functionality as the FinalBuilder substitution, but without the extra steps, I put together a small utility that takes an input file, a “substitute” file to be processed and a series of “sections” to use to perform the replacement. So for example, if you had the following INI file:

[MAIN]
SVNServer=MySvnServer
SVNPort=80

[INT]
Server=IntServer
Username=IntUser
Password=Password

[SYS]
Server=SysServer
Username=SysUser
Password=Password

And a “substitute” file as follows (this obviously isn’t a configuration file, it’s purely a very basic sample 🙂 ):

Subversion Server: %SVNServer%:%SVNPort%

Server: %Server%
Details : %Username% / %Password%

Running it through the utility and specifying the MAIN and INT sections (I generally use a “global” section, then configuration specific sections) would give us:

Subversion Server: MySvnServer:80

Server: IntServer
Details : IntUser / Password

More Information

So there you go, it’s a very, very simple utility, and indeed very little code; but I thought it might be of use to people who might be using FinalBuilder, or even people doing “manual” configuration management. It currently only supports INI files, but adding support for other file format is just a case of creating a new VariableReader implementation and decorating it with a ReaderHandles attribute to signify what “mode” you want it to handle.

I’ve uploaded it onto CodePlex at http://substitute.codeplex.com/, so feel free to grab it, play with it, edit it or criticise it to your hearts content.

Strange Problem – Unable to Connect to the ASP.Net WebServer on Localhost

Introduction

This problem appeared out of the blue in Visual Studio 2005 on my work laptop. Google didn’t help with a solution, so I thought a brief blog post was in order.

The Issue

Trying to launch any ASP.Net application on my local machine, either in debug mode or starting without debugging, started the Cassini ASP.Net Webserver just fine, but the browser just threw up an “unable to connect” error. Google seemed to suggest it might be a corrupt webserver exe, but it seemed to be running fine so I ignored that option. I tried manually specifying a port in the project settings, and even using telnet to try access the port on localhost from the command prompt, but even though the webserver was running, nobody was listening!

The Fix

After clutching at random straws for a while I did a “ping localhost” from the command prompt and noticed it was returning replies from ::1 (the IPv6 “loopback” address). I popped open my hosts file (c:\windows\system32\drivers\etc\hosts) and noticed that localhost was mapped to ::1, but not to 127.0.0.1. I have no need for IPv6 on my machine so I commented out that line and added:

127.0.0.1       localhost

Fired up Visual Studio, pressed F5 and voila – all fixed! I’m not sure why this was suddenly a problem, it just appears that Cassini just doesn’t like being accessed via IPv6, but this seems to be the solution if this issues bites you 🙂