Announcing: TinyMessenger

Introduction

Just a small post to announce I have added, and finally documented, TinyMessenger to the TinyIoC project.

Tiny What-Now?

TinyMessenger provides an event aggregator/messenger for loosely coupled communication. Some scenarios where this may prove useful :

  • Communication between Controllers/ViewModels.
  • Service classes raising “events”.
  • Removing responsibilities from classes that receive external events (such as the AppDelegate in an iPhone application).
  • Decoupling communication between classes.

TinyMessenger uses a Publish/Subscribe model and is orderless, so you can subscribe to a message even if there’s nobody publishing, and you can publish one even if nobody is subscribed. It is also loosely coupled in that the publisher and subscriber know nothing of each other, all they both care about is the message itself. Some of the key features are:

  • Simple and orderless Publish/Subscribe API.
  • Messages either need to implement a simple “marker” interface, or they can build on the “base” classes that are in the box (TinyMessageBase and GenericTinyMessage<TContent>.
  • Subscriptions can supply an optional filter – only message that “pass” the filter are delivered.
  • Subscriptions can supply an optional “proxy”. A proxy can be used for marshalling to the ui thread, logging or many other purposes.
  • Subscriptions use weak references by default, but strong references can be specified if required.

TinyMessenger is part of the TinyIoC project, but it can be used completely independently – for more information take a look at the TinyMessenger Wiki page on the main TinyIoC site.

Why is Add Reference Still Horribly Broken in VS2010?

Introduction

We all know Add Reference is horribly broken in VS2008. We’ve all clicked it and had our hearts sink as we realised it was time to make a brew, grab lunch or take a weekend mini-break before even attempting to use Visual Studio again. Now VS2010 is in Release Candidate it’s obviously been fixed.. hasn’t it?!

Not All Change Is For the Better

The main issue with the VS2008 Add Reference dialog was that it took an age to load, mostly due to it enumerating all of the assemblies available to populate the .NET tab. If all  you wanted to do was add a project or file reference you still had to wait for it to finish building the .NET tab. Not good. In an attempt to fix the problem Microsoft has made two major changes to the dialog for VS2010:

  • The dialog now defaults to the Projects tab.
  • The .NET tab is now multi-threaded i.e. it loads types in the background.

The first of the two fixes is an excellent idea. If you want to use the Projects, Browse or Recent tabs then you don’t even need to look at that snail-paced .NET tab.

The second of the two fixes is horrible. Truly horrible. I’d even go as far as to say that if you actually want to use the .NET tab to add a reference then it’s actually *more broken than Visual Studio 2008*. Yes, I did say that. And I’ll say it again:

“If you actually want to use the .NET tab to add a reference then it’s actually more broken than Visual Studio 2008.”

To illustrate the point, lets say we want to add MEF, which sits in System.ComponentModel.Composition to our application, we’d probably do something similar to the following:

  1. Click Add Reference.
  2. Marvel at how quickly Add Reference Loaded.
  3. Click the .NET tab.
  4. Watch the first few items start to load up.
  5. Type “Sys” to jump down to System in the list.
  6. Go to select System.ComponentModel.Compo..oh no.. it’s moved.
  7. Scroll down, go to select Sys.. nope.. it’s moved again.
  8. Scroll down a bit more, click on.. nope, gone again.
  9. Swear.
  10. Wait until the thing has fully finished loading and then select what we want.

So what we have there is the same delay as it would have taken with VS2008, but with the added “fun” of playing a game of “chase the reference down the listbox” in a vain attempt to save yourself a few seconds.

Could It Be Done Better?

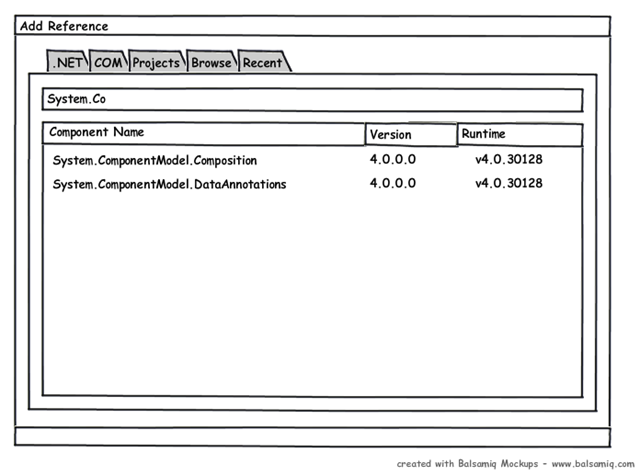
Now I’m no User Experience expert, or an Interface Designer with a fancy job title, but couldn’t this be improved immeasurably with a simple filter box?

Perhaps I work in a strange way, but I never start searching for a reference using the mouse – I *always* type the first few letters to skip to roughly where I want to go. If we had a simple filter box at the top of the dialog then the “chase the reference” game would be massively reduced, and probably eliminated all together if you’d typed in enough of the namespace name:

AddReference

Now we could get super fancy and support CamelCaseSearching like the QuickNav dialog in CodeRush, but I’d be quite happy with a basic filter.

Maybe I’m just picky.

Automated “Unit” Testing – It’s Not Just for TDD, It’s for Bug Fixing Too!

Disclaimer – What I’m discussing here isn’t unit testing (hence the quotes), it’s more functional or integration testing; but as the term “Unit Testing” is often “abused” to mean “anything that uses a (unit) testing framework” so I’ve included it in the title to avoid confusion.

Introduction

I’m currently using TinyIoC in my first forays into MonoTouch development, and my initialisation code was throwing a resolution error on starup:

var container = TinyIoCContainer.Current();
var mainView = new MainView();
container.Register<IViewManager>(mainView);
container.Register<IView, MainView>(mainView, "MainView");
container.Register<IView, SplashView>("SplashView").UsingConstructor(() => new SplashView());
container.Resolve<IView>("MainView");
container.Register<IStateManager, StateManager>();
// Code was blowing up here..
var stateManager = container.Resolve<IStateManager>();
stateManager.Init();

The Exception that was given was that IStateManager could not be resolved, which was odd given that the StateManager was registered against IStateManager, and everything in its constructor was also registered:

public StateManager(IViewManager viewManager, Func<string, IView> viewFactory)

To The Debugger.. Right?!

So at this point your immediate reaction may be to fire up the debugger, trace into the code and start hacking around, debugging and hacking around some more until it works. Sure, that’s an approach, and one I’m sure we’ve all used in the past; but as I was pretty sure the issue was in TinyIoC itself I took a slightly different tack.

To The Test Runner!

With the approach above I would have to build and run my app every time I wanted to check if my “fix” had actually worked – and even if it had, how would I know it hadn’t broken something else? The solution is quite simple – recreate the conditions of the bug in a unit test, using stubs/mocks to replace your real classes, and make sure it fails in the same way:

[TestMethod]
public void Dependency_Hierarchy_With_Named_Factories_Resolves_All_Correctly()
{
    var container = UtilityMethods.GetContainer();
    var mainView = new MainView();
    container.Register<IViewManager>(mainView);
    container.Register<IView, MainView>(mainView, "MainView");
    container.Register<IView, SplashView>("SplashView").UsingConstructor(() => new SplashView());
    container.Resolve<IView>("MainView");
    container.Register<IStateManager, StateManager>();
    var stateManager = container.Resolve<IStateManager>();
    stateManager.Init();

    Assert.IsInstanceOfType(mainView.LoadedView, typeof(SplashView));
}

I’ve added an Assert to show what behaviour I think it *should* have. It’s a pretty horrible looking test, but it accurately represents what my failing code was doing, and the test fails as I expected it to. Now I can attach the debugger and find out what’s going on, safe in the knowledge I have a fast executing test available to verify my fix, and the rest of my test suite there to ensure I haven’t broken anything else.

After a very brief investigation it turned out that there was a bug in registration when *just* an Interface type was registered with an concrete instance (the IViewManager registration above). The “InstanceFactory” it was using hadn’t set the “AssumeResolves” flag, so TinyIoC was actually trying to find a valid constructor for IViewManager – which obviously wasn’t going to succeed. It’s a scenario I probably should have factored into my Unit Tests, but hey, nobody is perfect 🙂

Conclusion

This post is aimed at covering two points:

  1. Test aren’t just for TDD. If you find a bug, isolate it with a test and you have a quick and easy way to verify a fix, and verify you haven’t broken anything else.
  2. Code Coverage isn’t everything. Apart from a few “defensive coding” null checks, the core of TinyIoC has pretty much 100% code coverage with its tests, but it didn’t help me with this issue. Although the code path was covered, the exact input (Interface type, concrete instance) wasn’t in my unit tests, so don’t assume 100% code coverage means 0 bugs in the code, there may well be a scenario you missed!

Announcing: TinyIoC – An Easy to Use, Hassle Free, Inversion of Control Container

Introduction

Whenever I start a new “pet” project I usually *want* to use IoC, but I don’t really want the hassle of taking a dependency on a container, or adding another binary to my project. Usually this leaves me using “poor man’s IoC”, whereby I define dependencies in my constructors, but I pass them in manually or construct them using constructor chaining.

I’ve thought for some time that it would be useful to put together a container that fits the bill for that scenario, but also attempts to “lower the barrier of entry” for developers that are new to IoC, and may be scared off by the “big boys”. A couple of weeks ago @DotNetWill posted his simplified container, and that gave me the kick up the backside I needed to create my own 🙂

Introducing TinyIoC

Now you might ask “do we really need *another* IoC container?” – and it’s a reasonable question. We already have Unity, Ninject, StructureMap, AutoFac.. the list goes on. TinyIoC makes no attempt to go “head to head” with any of these other containers, instead TinyIoC has been designed to fulfil a single key requirement:

To lower the “level of entry” for using an IoC container; both for small projects, and developers who are new to IoC.

To that end, TinyIoC attempts to stick the following core principals:

  • Simplified Inclusion. No assembly to reference, no binary to worry about, just a single cs file you can include in your project and you’re good to go. It also works on Mono, and on MonoTouch for the iPhone / iPad.
  • Simplified Setup. With auto-resolving of concrete types and an “auto registration” option for interfaces, setup is a piece of cake. It can be reduced to 0 lines for concrete types, or 1 line if you have any interface dependencies.
  • Simple, “Fluent” API. Just because it’s Tiny, doesn’t mean it has no features. A simple “fluent” API gives you access to the more advanced features, like specifying singleton/multi-instance, strong or weak references or forcing a particular constructor.

The following snippet gives an example of the simplified setup:

// TinyIoC provides a lazyily constructed singleton
// version of itself if you want to use it.
var container = TinyIoCContainer.Current;

// By default we can resolve concrete types without
// registration
var instance = container.Resolve<MyConcreteType>();

// We can automatically register all concrete types
// and interfaces with a single call.
container.AutoRegister();
var implementation = container.Resolve<IMyInterface>();

So Where Now?

If you want to grab the source, read the tests, or take a look at some more complex examples of the API, wander on over to the homepage on bitbucket. I’m happy to take comments and suggestions – just grab me on Twitter or ping me an email from the contact form.

Over the next few weeks I will be posting a series of “beginners” articles on the hows and whys of IoC. I will be using TinyIoC specifically, but the majority of concepts and content can equally apply to other containers. I may even do a “File, New” screencast to show how “un-scary” this stuff is, and how it doesn’t really add any extra development effort,

Moving a Repository from SVN to Mercurial With Full History

Disclaimer

Let me start with a disclaimer. I’ve only been using Mercurial for 2 days so my nomenclature may be completely wide of the mark. Hopefully this post will help other hgnewbies with what is probably a common requirement.

Introduction

I keep all of my pet projects in my own Subversion repository but I’ve recently decided to give this distributed version control shenanigans a whirl. I ummed and arred about Git or Mercurial, but in the end I plumped for Mercurial, with a bitbucket account, as it seems to have more ubiquitous support. I’m about to release a project I’ve been working on for the last week or so and thought it would be nice to release it via bitbucket – complete with the version history I’d build up in Subversion.

Turns out, it’s really rather easy!

I’m Converted!

I’m assuming at this point you have the commandline version of Mercurial (hg) installed and working. If you don’t then you should probably go and do that first 🙂 I’ve also assumed you’ve already created a mercurial repository (bitbucket or elsewhere) called “myproject”.

In my scenario I was converting a single project with no trunk, branch or tag directories. The convert command is capable of handling much more advanced scenarios – take a look at the documentation for more infomation.

First things first you need to edit your Mercurial settings (.hgrc for *nix, Mercurial.ini in your user dir for Windows) and add the following lines:

[extensions]
hgext.convert=

This will add the “convert” command extension to our client. Next up we clone our repository and use the new convert command to add the SVN changesets into it:

hg clone https://bitbucket.org/myuser/myproject

hg convert http://mysvn.server.com/svn/myproject/ myproject

The convert command will now start counting down the revisions and adding each one to our local hg repository. This may well take some time 🙂

Potential gotcha: it appears that the convert extension doesn’t work properly with Subversion repositories over http that require authentication. If you get multiple “http authorization required” messages and prompts for your username/password then you have a problem. The only solution I found was to temporarily disable authentication while I did the conversion 🙁

Once the conversion had finished we push our changes back:

cd myproject

hg push

Now at this point for me the push worked fine but my local repository had no files in it – despite insisting it was up to date. This may be my lack of knowledge on Mercurial, or it might be a bug, but deleting the myproject directory locally and cloning the remote repo again sorted things out.

Conclusion

All in all a pretty trivial task, albeit one that takes a while with a large repository. The only big issue is the authentication one I mention above – this may well be a showstopper for you if you can’t control the ACL on your Subversion repository.