Why Shouldn’t I use PRISM?

Introduction

PRISM, or Composite Application Guidance/Library for WPF/Silverlight, is a library and a corresponding guidance document that helps you to build loosely coupled “composite” WPF and Silverlight applications.

The library itself “sits on top” of an Inversion of Control Container (Unity by default), and provides facilities for modularising your application, composing your UI from components, loosely coupling events and, in Silverlight’s case, only downloading parts of your application as and when they’re required.

Sounds great doesn’t it?

So, There Must Be Something Wrong With It.. Right?

Plenty has been written about PRISM, its benefits, and how to get started; but very little on why you wouldn’t use it on your next WPF/Silverlight project. I’ve put together some concerns, based both on criticisms I’ve read, and supposition on my part; and some commentary about whether I believe those concerns are well founded or not.

“I’m Only Doing a Small Project!”

Granted, PRISM is rather overkill for “toy” applications; but are you sure your application is always going to stay that small and simple? One of the big advantages of the modular nature of a PRISM app is being able to add and test new features with relative ease. I’m sure we’ve all started projects that started off as a simple little toy app, but have since grown organically into something rather more complex – possibly ending up with some pretty kludgey code at the end of it.

“It’s Complicated!”

No; it’s not. Really. There’s nothing particularly complex in PRISM, either conceptually or in the code you have to write. Once you understand the structure of a PRISM project, you’ll probably find that your code is actually easier to follow, as it is separated into clearly defined parts.

If you want an easy to follow tutorial that takes you from File.. New, through to a working application, then take a look at the excellent screencasts from Blaine Wastell’s blog.

“It Takes Too Long To Use! There’s Too Much Overhead!”

If you’ve watched some of the initial screencasts about PRISM, or had a peak at some sample code, you might be thinking that the overhead of creating all these “extra” classes and projects is just too much. While it certainly is more work than just File.. New and throwing controls on a page; once your initial project structure and bootstrapper is setup, adding new modules is no more time consuming than adding a normal User Control.

Separating your view from it’s logic; whether it be with ViewModels, the Presentation Model, or any other pattern, is going to be slightly more work; but the testability and data binding benefits far outweigh any slight increase in typing!

“It Will Add Bloat to My Silverlight App!”

The PRISM binaries, including Unity, weigh in at around 270k; and squeeze down to approximately 100k when zipped. Not exactly tiny, but not exactly Bloaty McBloater. In fact, if you take advantage of PRISM’s ability to bundle parts of your Silverlight application into different XAP files, and only load them when needed, you may find your initial payload is actually smaller than it would be without PRISM.

“You Have To Use Unity! I Don’t Want That Dependency!”

I’ve seen this repeated several times, but it’s simply not true. Although PRISM “out of the box” uses Unity, and comes with a Unity Bootstrapper; you can plug in your own IoC container without too much trouble. At the time of writing I believe there are alternatives for Spring.Net, Castle Windsor and StructureMap already written for you.

“I Want Control Over *ALL* My Damn Code!”

Firstly, if you’re writing a .Net application then chances are you are calling at least one library that you didn’t write 🙂 Secondly, PRISM is very “lightweight”. It’s a helping hand at your disposal, rather than a monolithic framework that takes over your whole application and forces you to work in a certain way. Thirdly, you can just pick and choose which parts of PRISM you want to use, it’s not an “all or nothing” proposition. Don’t like the view composition? Then don’t use it! And finally, it’s all open source, so if you don’t like the way something works – change it! 🙂

“It’s From MS – So It Sucks!”

Unfortunately if someone holds this view, then there’s probably nothing anyone can say to change their mind. While everything that comes out of Microsoft isn’t perfect, far from it, it most certainly doesn’t all suck 🙂

With PRISM, the exceedingly smart guys from the Patterns and Practices team have created an excellent set of tools and guidance to help solve some very common problems; without producing a heavy, complicated framework in the process (CAB anyone? 🙂 )

“I Can’t Frikkin’ Find It!”

Ok, I admit it, you’ve got me on this one! 🙂 Is it on MSDN? Is it on CodePlex? Both?! Is it called PRISM? The Composite Application Library (CAL)? Or maybe Composite Application Guidance for WPF and Silverlight (CAG)?

Now CAL obviously refers to the library, CAG to the guidance, and I believe PRISM is an umbrella term for the whole project, but the naming is certainly confusing, and searching for PRISM takes you to CodePlex then MSDN and back again, so it’s very easy to get confused! In fact, finding, downloading and building the library is actually MORE confusing than using the damn thing! There is actually a whole article on Sparking Client on How to Find, Download and Build Prism for Silverlight, which speaks volumes 🙂

I really don’t see what’s wrong with calling the whole thing PRISM and leaving it at that. If I say  “.Net Framework”, then most developers would know what I mean. There’s certainly no need for me to call it the “Microsoft Framework for Building Managed Applications Targeting the Windows Platform (MFBMATWP)” 😉

Tell Me More!

If you want to know more about PRISM, or if you want some walkthroughs and examples of how to use it, then here’s some links that should float your boat:

Strange Problem – Unable to Connect to the ASP.Net WebServer on Localhost

Introduction

This problem appeared out of the blue in Visual Studio 2005 on my work laptop. Google didn’t help with a solution, so I thought a brief blog post was in order.

The Issue

Trying to launch any ASP.Net application on my local machine, either in debug mode or starting without debugging, started the Cassini ASP.Net Webserver just fine, but the browser just threw up an “unable to connect” error. Google seemed to suggest it might be a corrupt webserver exe, but it seemed to be running fine so I ignored that option. I tried manually specifying a port in the project settings, and even using telnet to try access the port on localhost from the command prompt, but even though the webserver was running, nobody was listening!

The Fix

After clutching at random straws for a while I did a “ping localhost” from the command prompt and noticed it was returning replies from ::1 (the IPv6 “loopback” address). I popped open my hosts file (c:\windows\system32\drivers\etc\hosts) and noticed that localhost was mapped to ::1, but not to 127.0.0.1. I have no need for IPv6 on my machine so I commented out that line and added:

127.0.0.1       localhost

Fired up Visual Studio, pressed F5 and voila – all fixed! I’m not sure why this was suddenly a problem, it just appears that Cassini just doesn’t like being accessed via IPv6, but this seems to be the solution if this issues bites you 🙂

WPF Bootstrapping, NotifyIcon, ShutdownMode and the Mysterious Vanishing Application!

Introduction

I’m currently working on a small utility called Hotwire, which should be released in the not too distant future. Part of the application consists of a “launcher” application that sits in the notification area (the bit by the clock :-)) and fires up various other parts of the app when the user needs them.

Originally I put it together as a WinForms app, which seemed logical as the NotifyIcon class lives in System.Windows.Forms anyway, but once I’d started putting the configuration dialog together, I realised how much I missed the Binding magic of WPF. Although shifting the app across to WPF was a relatively simple task, there were a couple of “gotchas” along the way.

The WinForms Way – Without a Window!

A lot of the samples you’ll see for using NotifyIcon in WinForms will create a Window, put the NotifyIcon class on the form, and hide the form on startup so all you’re left with is the icon by the clock. While this approach works, as this application doesn’t have a “main window” as such,  it seemed a bit naff to have a hidden Window lurking in the background that I’d never use.

To do things slightly more “elegantly” we can “bootstrap” our application manually with our own Main() method, and put together a class that creates all of the controls required for our NotifyIcon and it’s various menus. Our Main() method is very simple; we just set a few properties, instantiate our TaskTray class and call Application.Run() to give us our Windows message pump (if you don’t do the last part, your application will quit immediately!)

static class Program
{
    private static TaskTray t;
    
    /// <summary>
    /// The main entry point for the application.
    /// </summary>
    [STAThread]
    static void Main()
    {
        Application.EnableVisualStyles();
        Application.SetCompatibleTextRenderingDefault(false);
        t = new TaskTray();
        Application.Run();
    }
}

Now our TaskTray.cs file will intentionally look spookily similar to the code behind for a normal WinForms window. All we need to do in our constructor is create a Container, a NotifyIcon, a ContextMenuStrip to attach to it, and an icon for us to display. To maintain parity with a normal codebehind class, we will wrap all of this up into a method called InitialiseComponent:

public void InitializeComponent()
{
    this.components = new System.ComponentModel.Container();
    this.SysTrayIcon = new System.Windows.Forms.NotifyIcon(this.components);
    this.MainMenu = new System.Windows.Forms.ContextMenuStrip(this.components);
    this.aboutToolStripMenuItem = new System.Windows.Forms.ToolStripMenuItem();
    this.configToolStripMenuItem = new System.Windows.Forms.ToolStripMenuItem();
    this.exitToolStripMenuItem = new System.Windows.Forms.ToolStripMenuItem();
    this.MainMenu.SuspendLayout();

    this.SysTrayIcon.ContextMenuStrip = this.MainMenu;
    this.SysTrayIcon.Icon = new System.Drawing.Icon(this.GetType(), "myapp.ico");
    this.SysTrayIcon.Text = "MyApp";
    this.SysTrayIcon.Visible = true;

    this.MainMenu.Name = "MainMenu";
    this.MainMenu.Size = new System.Drawing.Size(114, 82);

    this.MainMenu.Items.Clear();

    this.aboutToolStripMenuItem.Name = "aboutToolStripMenuItem";
    this.aboutToolStripMenuItem.Size = new System.Drawing.Size(113, 22);
    this.aboutToolStripMenuItem.Text = "&About";
    this.MainMenu.Items.Add(aboutToolStripMenuItem);

    this.configToolStripMenuItem.Size = new System.Drawing.Size(113, 22);
    this.configToolStripMenuItem.Text = "&Configuration";
    this.MainMenu.Items.Add(configToolStripMenuItem);

    this.MainMenu.Items.Add(new System.Windows.Forms.ToolStripSeparator());

    this.exitToolStripMenuItem.Name = "exitToolStripMenuItem";
    this.exitToolStripMenuItem.Size = new System.Drawing.Size(113, 22);
    this.exitToolStripMenuItem.Text = "E&xit";
    this.MainMenu.Items.Add(this.exitToolStripMenuItem);

    this.MainMenu.ResumeLayout(false);
}

We can then hook some events up in the normal manner and we’re all done, and no Window classes in sight!

The WPF Way – Still Without a Window!

To port this to WPF we first need to add references to System.Windows.Forms and System.Drawing (for our Icon), once that’s done we need to roll our own “bootstrapper” so we don’t create a Window on startup.

By default, when you create a new WPF application, you will get Window1.xaml and App.xaml. The latter contains a StartupUri property that the generated code behind uses to bootstrap the application and display the main window. If we nuke App.Xaml from the project (we’ll get a duplication Main() error if we don’t), we can add our own bootstrapper which looks very similar to the WinForms one above:

class BootStrap
{
    static TaskTray _taskTray;

    [STAThread]
    static void Main()
    {
        Application app = new Application();
        _taskTray = new TaskTray();
        app.Run();
    }
}

If you add our TaskTray class into this new project (making sure to add a Using statement for System.Windows), and fire it up we will get our NotifyIcon as before and it looks like we’re all done! Or are we… 🙂

What? Where Did My App Go?

If you decide you want to show a Window from one of your menu items, such as a configuration window, you’ll immediately notice that as soon as the user or application closes that window then your application will immediately quit!

The reason for this is down to the default behaviour of the WPF Application object. The Application object keeps track of all of the Windows opened (as well as a “special” MainWindow which is automatically set to the first Window that is created inside the Application) and when the last window closes, it terminates the application. This default behaviour makes sense for a “normal” application, because most of the time we WANT it to shutdown properly when all the windows are closed; but in our scenario it’s a huge pain in the ****!

The Fix

Our immediate reaction might be to create a “dummy” Window in our bootstrapper and keep it hidden somehow; but this is the same “hack” as the one I disliked from the WinForms version, so we really want to avoid doing that.

Luckily, we can override this behaviour using the ShutdownMode property on our Application object. We can tell it to either terminate only when the MainWindow window closes, or only shutdown when we explicitly tell it to (which is what we want for our application). This changes our bootstrap class to the following:

class BootStrap
{
    static TaskTray _taskTray;

    [STAThread]
    static void Main()
    {
        Application app = new Application();
        app.ShutdownMode = ShutdownMode.OnExplicitShutdown;
        _taskTray = new TaskTray();
        app.Run();
    }
}

We then need to make sure we call Application.Shutdown when we want to quit, which we can do from our Exit menu option:

this.exitToolStripMenuItem.Click += (s, e) => 
    { 
        Application.Current.Shutdown(); 
    };

You can grab the code below:

WpfNotifyIconTest.zip

Self Hosting ADO.Net Data Services (Astoria) – Part II – A Basic WCF Service Example

Introduction

In this post we will extend our previous example to include a very basic “normal” WCF service, and also add a client that consumes both services.  Hopefully this article will also serve as a very basic introduction to WCF services in general. If you happen to have a customer that’s asking for a WinForms app that can display some random remote data and add two numbers together, then everything you need is right here! 🙂

If you have created “normal” WCF service projects in the past you will probably be used to being able to click “Discover” in the “Add Service Reference” dialog. Unfortunately, because we’re not using a standard project, we have to do a little bit of work ourselves to get the references added.

Please see the original article for information on how we setup the project initially, and some Vista specific settings.

Server

Creating the WCF Service

Other than renaming the namespace (remembering to change the App.Config system.ServiceModel section to point to the new namespace) our server project remains the same as before. We will add a very simple WCF service that adds 2 numbers together and returns the result to the client.

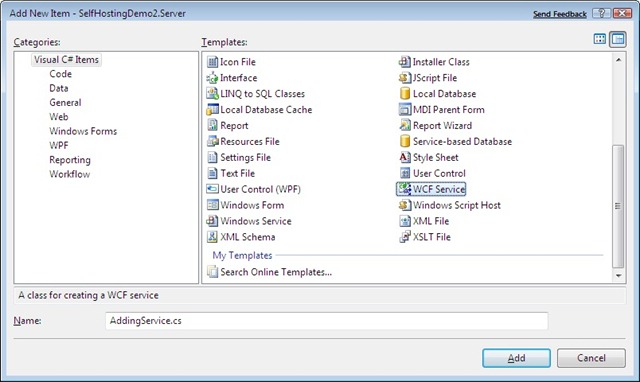
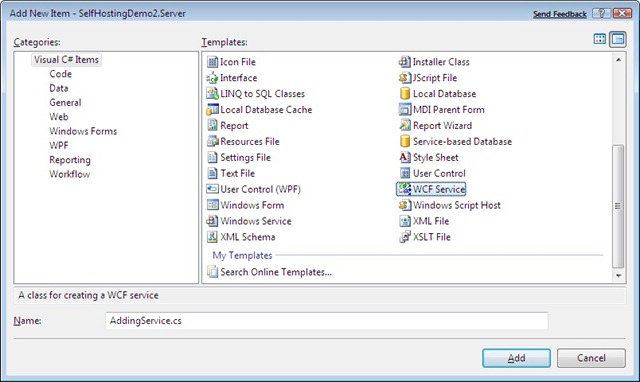
To add a WCF service we right click on the project, choose add new, and select WCF Service from the list:

Add WCF Service Dialog

This will add an interface to our project (IAddingService.cs), and a concrete class that implements it (AddingService.cs). It will also add a lot of configuration information into our app.config which we will talk about later.

If you open the interface file you will see the class and default method decorated with attributes to signify they are WCF “Contracts”. The ServiceContract attribute signifies that a particular class or interface defines a service contract for WCF, the OperationContract attribute is applied to a method to signify it’s an operation in the service (i.e. it’s a callable method), and the DataContract attribute is used to expose custom data types via the service. For this demonstration we will use a single ServiceContract containing a single OperationContract.

We’ll remove the default method that Visual Studio has added, and replace it with a method that takes 2 integers and returns an integer. Our interface definition now looks like this:

[ServiceContract]
public interface IAddingService
{
    [OperationContract]
    int AddNumbers(int a, int b);
}

If we now change our class to implement the new interface we end up with this:

public class AddingService : IAddingService { public int AddNumbers(int a, int b) { return a + b; } }

Service Configuration

If you now open our App.Config you’ll notice a whole raft of changes that Visual Studio has added for us. The majority of what is added is beyond the scope of this article, the only part we need to worry about for this quick demonstration is the newly added service tag. We will stick to wsHttpBinding for this demo, so we can remove the mex binding line. We will also change the default baseAddress to listen on the same port as our ADO.Net Data Servics service (but on a different url).

<service behaviorConfiguration="SelfHostingDemo2.Server.AddingServiceBehavior"
  name="SelfHostingDemo2.Server.AddingService">
  <endpoint address="" binding="wsHttpBinding" contract="SelfHostingDemo2.Server.IAddingService">
    <identity>
      <dns value="localhost" />
    </identity>
  </endpoint>
  <host>
    <baseAddresses>
      <add baseAddress="http://localhost:8751/WCFService/" />
    </baseAddresses>
  </host>
</service>

That’s it for our server – now we can move onto our client app

Client

Adding Service References

Ok, now the server is finished we will add another WinForms application to serve as our client. Once the new project is added we need to add the Service References to point to our two services.

If we were using a “normal” WCF Service project, or an ADO.Net Data Services project then Visual Studio allows us to click “Discover” in the Add Service Reference Dialog and it will automatically fire up the services and enumerate them for us. As we’re not using those project types we have to do a bit of extra work ourselves. Firstly, fire up the server application either with CTRL+F5 (start without debugging) or by double clicking the exe; we don’t want to be running in debug mode or Visual Studio may not let us add references. Once the server is running we can right click on our client project, choose Add Service Reference and point it at each of our service URLs in turn (http://localhost:8751/selfhosted/ for our data service and http://localhost:8751/WCFService/ for our WCF service):

AddWCFService

Once that’s done we can close down our server app for now. It’s worth noting that if you alter the service and want to update the client reference then you need to go through the same process of firing up the server app before you choose Update Service Reference.

Note: These steps create “proxy” classes in our project for accessing our services. You can also create these classes using SvcUtil.exe (for WCF services) and DataSvcUtil.exe (for Data Services

Adding Some Functionality

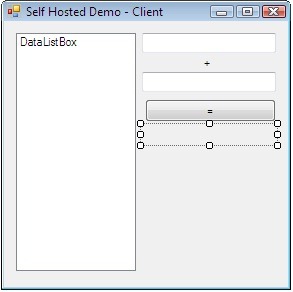
To demonstrate the application we will data bind a control to some data from our data service, and provide some controls for using our shiny new adding service. Our final interface will look like this:

ClientUI

Now we need to add some code :-)  Firstly we will add two variables for our two services, and instantiate them in our form’s constructor:

private DataService.DemoEntities dataService;
private WCFService.AddingServiceClient wcfService;

public Form1()
{
    InitializeComponent();

    dataService = new DataService.DemoEntities(new Uri(@"http://localhost:8751/selfhosted/"));
    wcfService = new WCFService.AddingServiceClient();
}

Creating our Data Services service requires us to pass in a Uri to locate the service. We would normally store this in a configuration file somewhere, but for ease of reading it is just hard coded in this demo.

Next up we bind our ListBox to some data (customers in our case). In a real world app we would probably do potentially time consuming tasks like talking to web services in a background thread, then use the Dispatcher to update the UI, but for this demonstration we will just block the UI thread 🙂

private void Form1_Load(object sender, EventArgs e)
{
    DataListBox.DataSource = dataService.Customers.ToList();
    DataListBox.DisplayMember = "CompanyName";
}

That should look very familiar to anyone that had data bound a WinForms control before 🙂 We could use LINQ to filter the list and do other fancy things, but we’ll stick to the full list for this demo.

The code for our Equals Button is equally as simple. The proxy class that Visual Studio has generated for us has done all the hard work, so we can just call Add as we would any other method:

private void EqualsButton_Click(object sender, EventArgs e)
{
    int number1;
    int number2;

    if ((!int.TryParse(Number1.Text, out number1)) || (!int.TryParse(Number2.Text, out number2)))
    {
        MessageBox.Show("Please enter valid integers");
    } 
    else
    {
        AnswerLabel.Text = wcfService.AddNumbers(number1, number2).ToString();
    }
}

Again, in a real world app we would probably put the call to the web service in a background thread and update the UI with a Dispatcher.

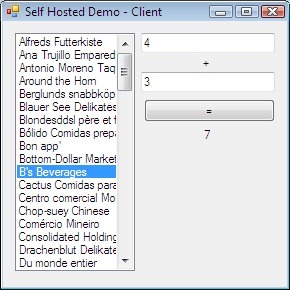
And that’s it! If you fire up the Server app, then fire up the client, you should end up with something that looks like this:

ClientUIRunning

You can grab the source code for the whole thing below:

selfhostingdemo2.zip

Self Hosting ADO.Net Data Services (Astoria)

Overview

As part of the recent Surface application there was a requirement to host both a “normal” WCF service, and an ADO.Net Data Services service inside the main application (rather than a service running under a website).  The former is very straightforward and well documented, but I was a bit short of information on the latter and the information I did have hadn’t been updated for the various RTM changes.

Luckily it’s very easy to do, so I thought I’d throw together a quick example.

Example Data

For this example I’ve used Entity Framework and the Northwind database. It’s dependant on SQL Server Express running as the SQLEXPRESS instance on the local machine, but ADO.Net Data Services can expose all kinds of data, take a look at MSDN or your friendly neighbourhood search engine for more information :-) 

Setup

To get things going we need two particular namespaces:

Service Definition

To define our service we simply create a new class, inherited from DataService<T>, and implement a single method InitializeService to define what entities to expose, and what permissions to give.  In this example DemoEntites is the name I gave to our Entity Framwork Model and we will just expose everything with full access.  For more information on this method, take a look at the MSDN documentation.

namespace SelfHostingDemo
{
    public class SelfHostedService : DataService<DemoEntities>
    {
        public static void InitializeService(IDataServiceConfiguration config)
        {
            config.UseVerboseErrors = true;
            config.SetEntitySetAccessRule("*", EntitySetRights.All);
            config.SetServiceOperationAccessRule("*", ServiceOperationRights.All);
        }
    }
}

The second part of defining the service is in the app.config, so add one if you haven’t already got one, and we need to add a system.serviceModel section and add the definition for our service:

<system.serviceModel>
  <services>
    <service name="SelfHostingDemo.SelfHostedService">
      <endpoint address="http://localhost:8751/selfhosted/" binding="webHttpBinding" contract="System.Data.Services.IRequestHandler" />
    </service>
  </services>
</system.serviceModel>

If you are running on Vista, and aren’t running with Administrator privileges, you will need to use netsh (as an Administrator) to allow us to bind to that endpoint address.  In this example we will just give the Users group access to listen on anything on port 8751:

netsh http add urlacl url=http://+:8751/ user=Users listen=yes

Firing It Up

To fire up our service we create a new WebServiceHost.  In this example I start it up inside Main():

try
{
    System.ServiceModel.Web.WebServiceHost aHost = new System.ServiceModel.Web.WebServiceHost(typeof(SelfHostedService));
    aHost.Open();
}
catch (Exception ex)
{
    Trace.WriteLine(ex, "Failed to start CRUD host");
}

And that’s all we need to do.  If you launch the example application you will be presented with a single button that opens the address of our service in your browser.  From there you should be able to navigate round the various entities and relationships.

SelfHostingDemo.zip